Yes — a CNC router can cut acrylic (PMMA), including sheets sold as Plexiglass or Perspex. But clean acrylic cutting isn’t automatic.
If your shop keeps fighting melting, chipped edges, white/cloudy edges, welded chips, or parts that move on the final pass, it’s almost always a process setup issue: sheet type, bit geometry, chip load, chip evacuation (air blast), workholding, entry strategy, and machine rigidity.
This guide is written for sign makers, display/fixture shops, acrylic fabricators, and small CNC router users who want a practical, repeatable workflow for how to cut acrylic with a CNC router.
How to cut acrylic with a CNC router: quick setup checklist
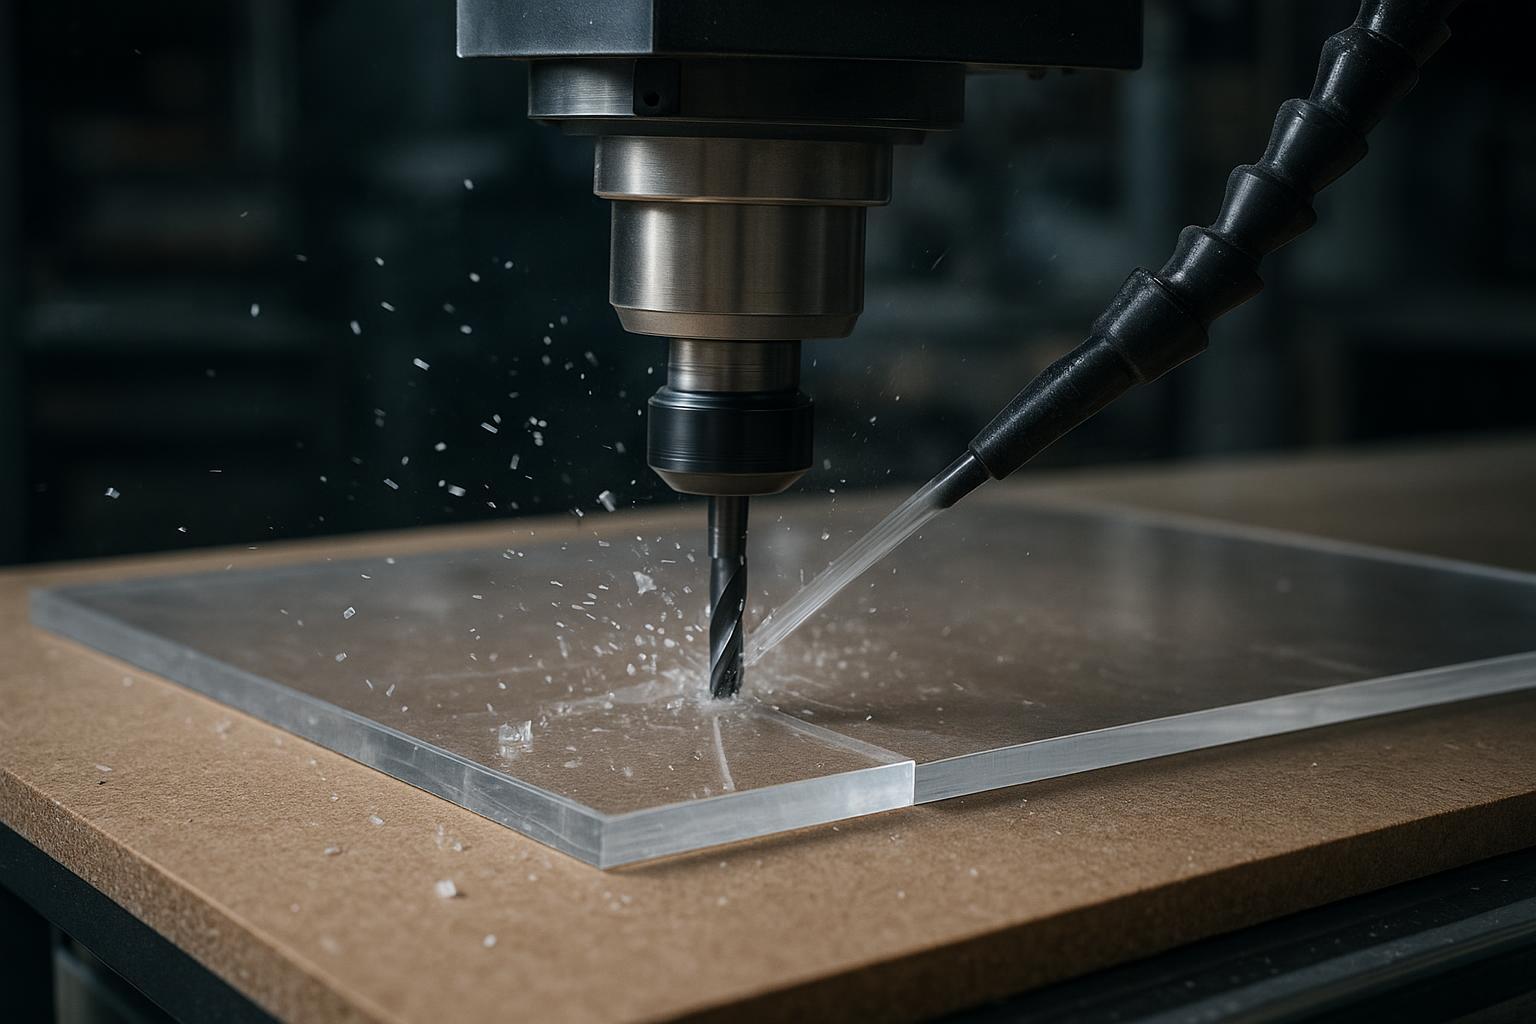
If you only remember one thing: acrylic CNC cutting is about heat + chip evacuation + holding the sheet still. The fastest way to get there is a sharp O-flute, correct chip load, strong air blast, and workholding that doesn’t let parts shift.
This section also targets the common searches cnc router acrylic and acrylic melting cnc router — because the fix is rarely “slow down,” it’s usually “stop rubbing, start cutting.”
Use this as your “first setup” checklist:
Checklist item | Why it matters |
|---|---|
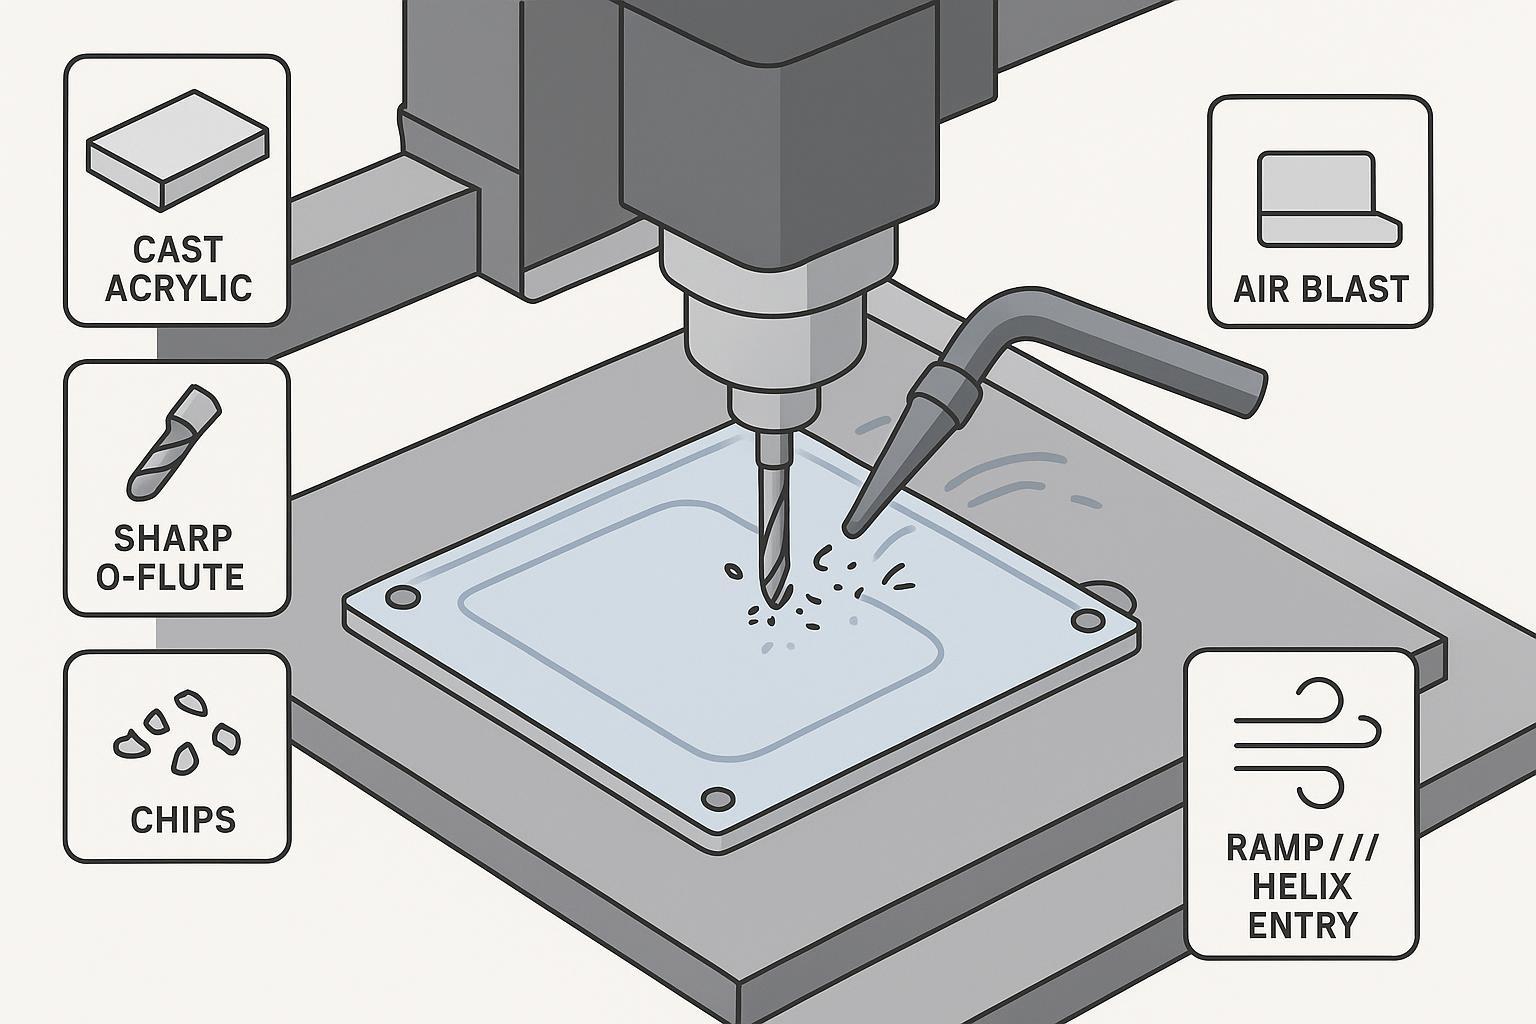
Use cast acrylic when edge/engraving quality matters | More forgiving than extruded |
Start with a sharp, polished single-flute O-flute | Best chip evacuation / less heat |
Aim for chips, not dust | Dust usually means rubbing and heat |
Add air blast at the cut | Clears chips so they don’t weld back |
Don’t rely on vacuum alone for small parts | Tabs/onion skin/tape prevent movement |
Ramp/helix entry, don’t plunge | Reduces chipping/cracking at entry |
Acrylic vs PMMA vs Plexiglass vs Perspex
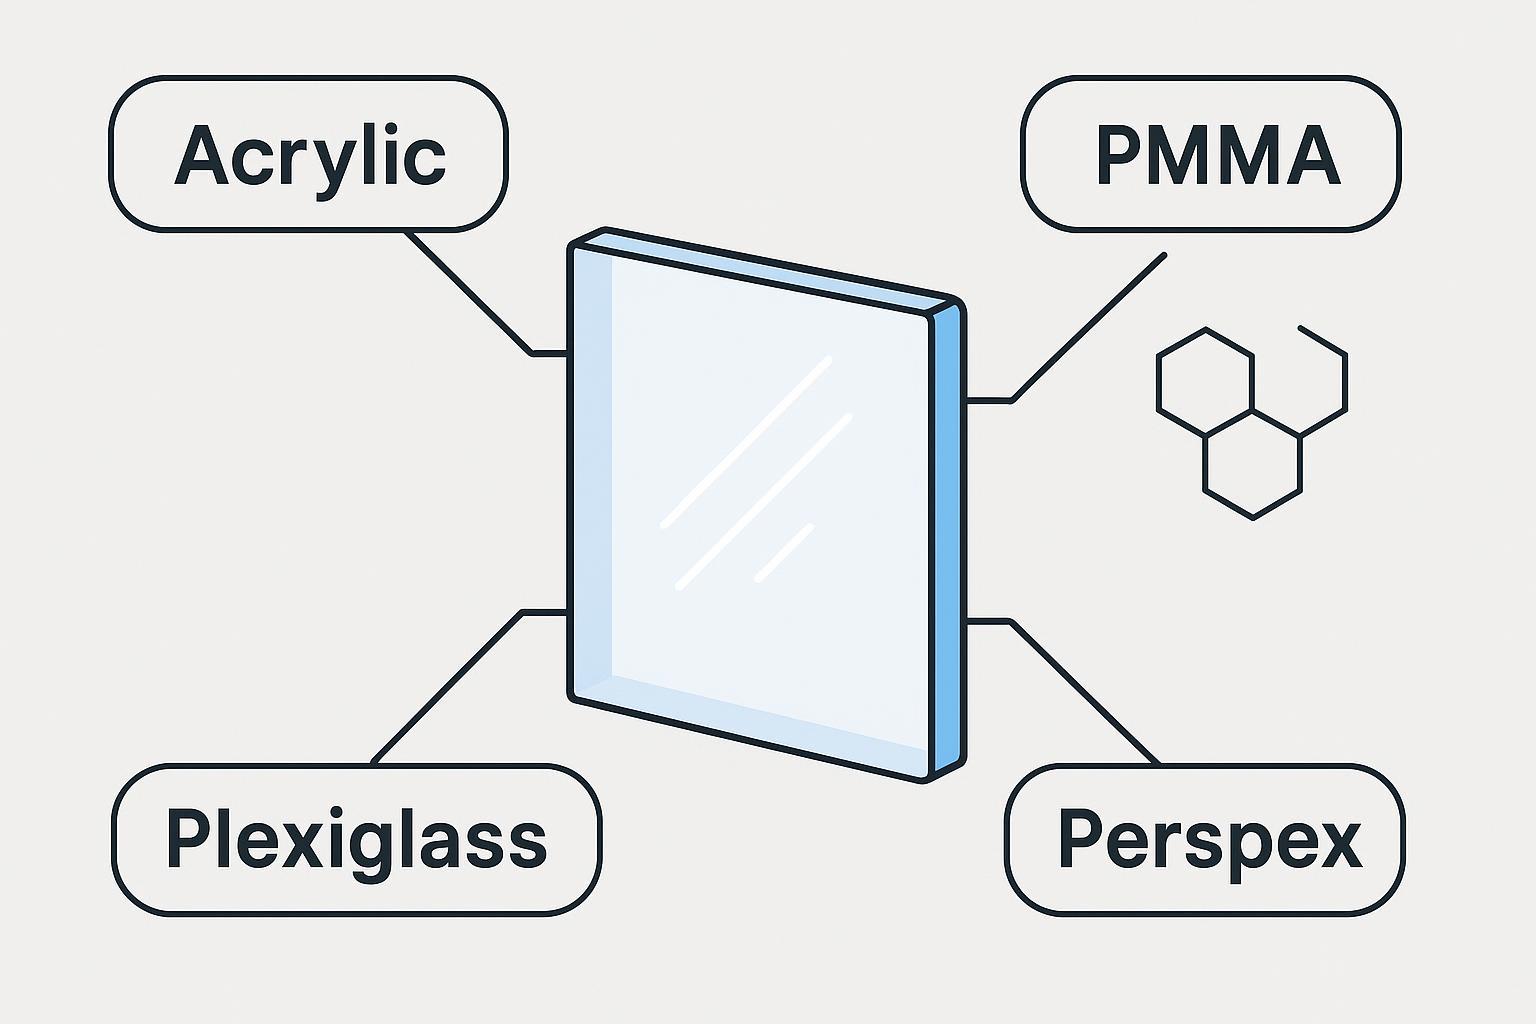
In most CNC cutting conversations, these names refer to the same general material:
Term | What it usually means |
|---|---|
Acrylic | Common name for the clear plastic sheet used in signs and displays |
PMMA | The chemical name: polymethyl methacrylate |
Plexiglass | A common brand/trade name that many people use as “acrylic” |
Perspex | Another common brand/trade name used as “acrylic” in some markets |
When someone searches “CNC plexiglass cutting” or “CNC perspex cutting,” they’re usually asking about routing acrylic sheet.
Cast acrylic vs extruded acrylic (this is the #1 hidden variable)
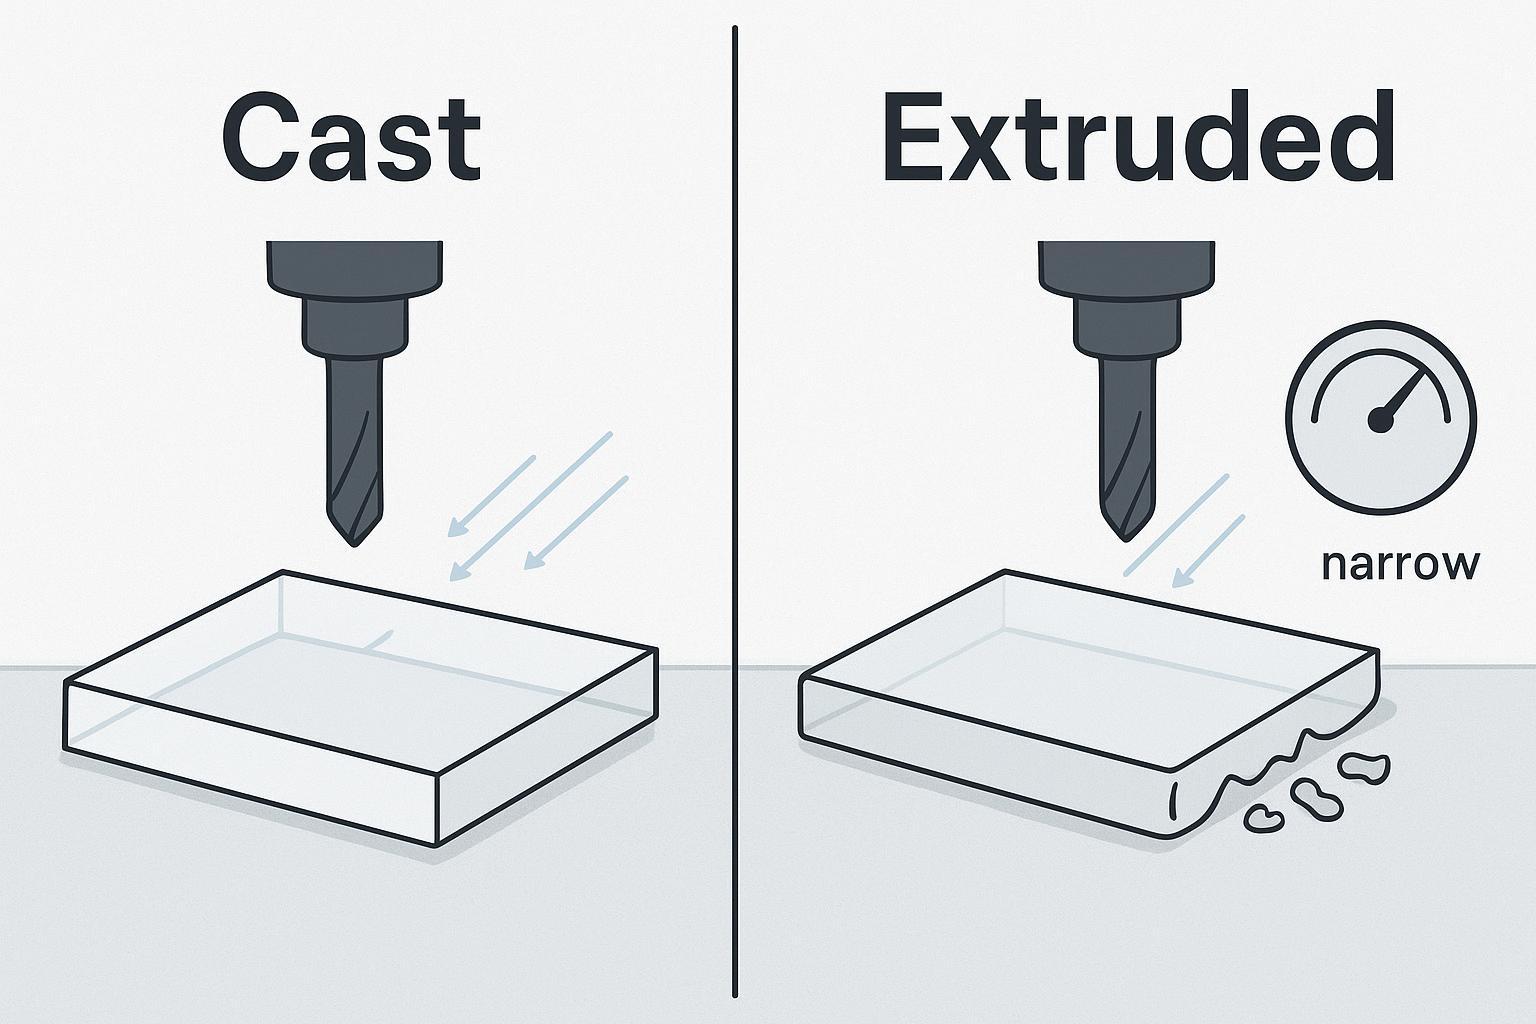
If you want the most forgiving material for CNC routing, cast acrylic is usually easier to machine than extruded acrylic.
Sheet type | CNC routing behavior | Best fit |
|---|---|---|
Cast acrylic | Cleaner chips, more stable edge quality, generally less gumming/melting | Signs, display parts, engraving, higher-finish work |
Extruded acrylic | Often cheaper, but softens/melts more easily and can be less forgiving | Budget work, simple profiles, jobs where you’ll test/tune carefully |
Extruded acrylic can be routed — it just has a narrower “good” window.
If you keep melting acrylic even after changing feeds and speeds, don’t assume your machine is the only problem. The sheet type matters.
(Background reading: cast vs extruded acrylic sheet comparison.)
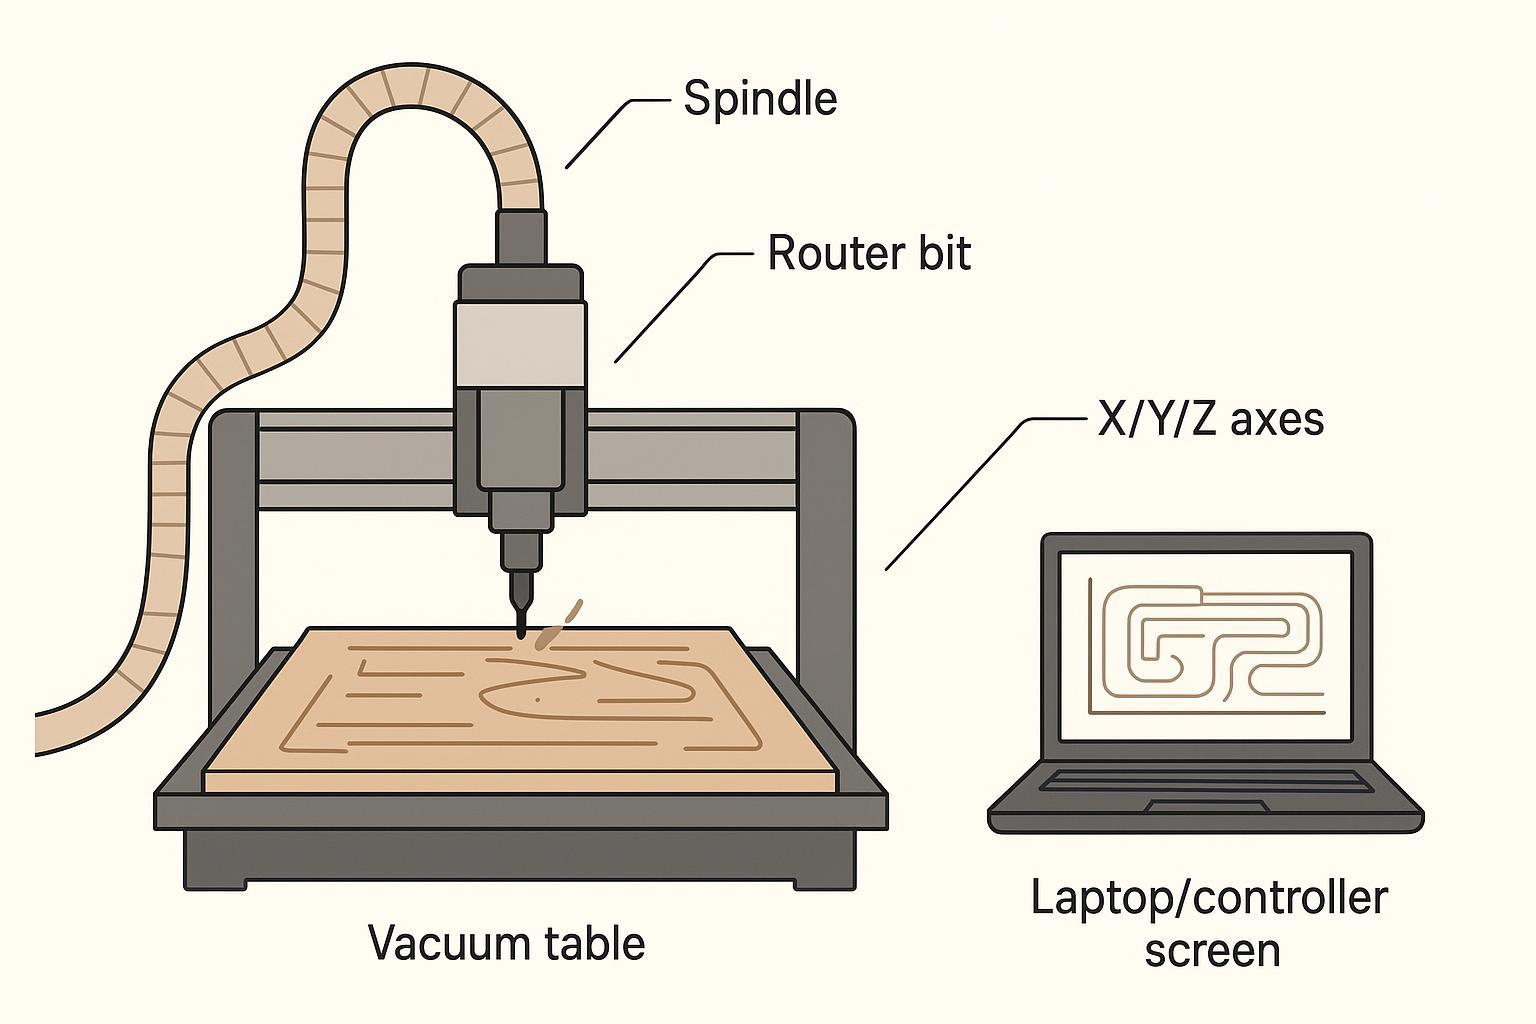
The best bit for cutting acrylic (and what usually goes wrong)
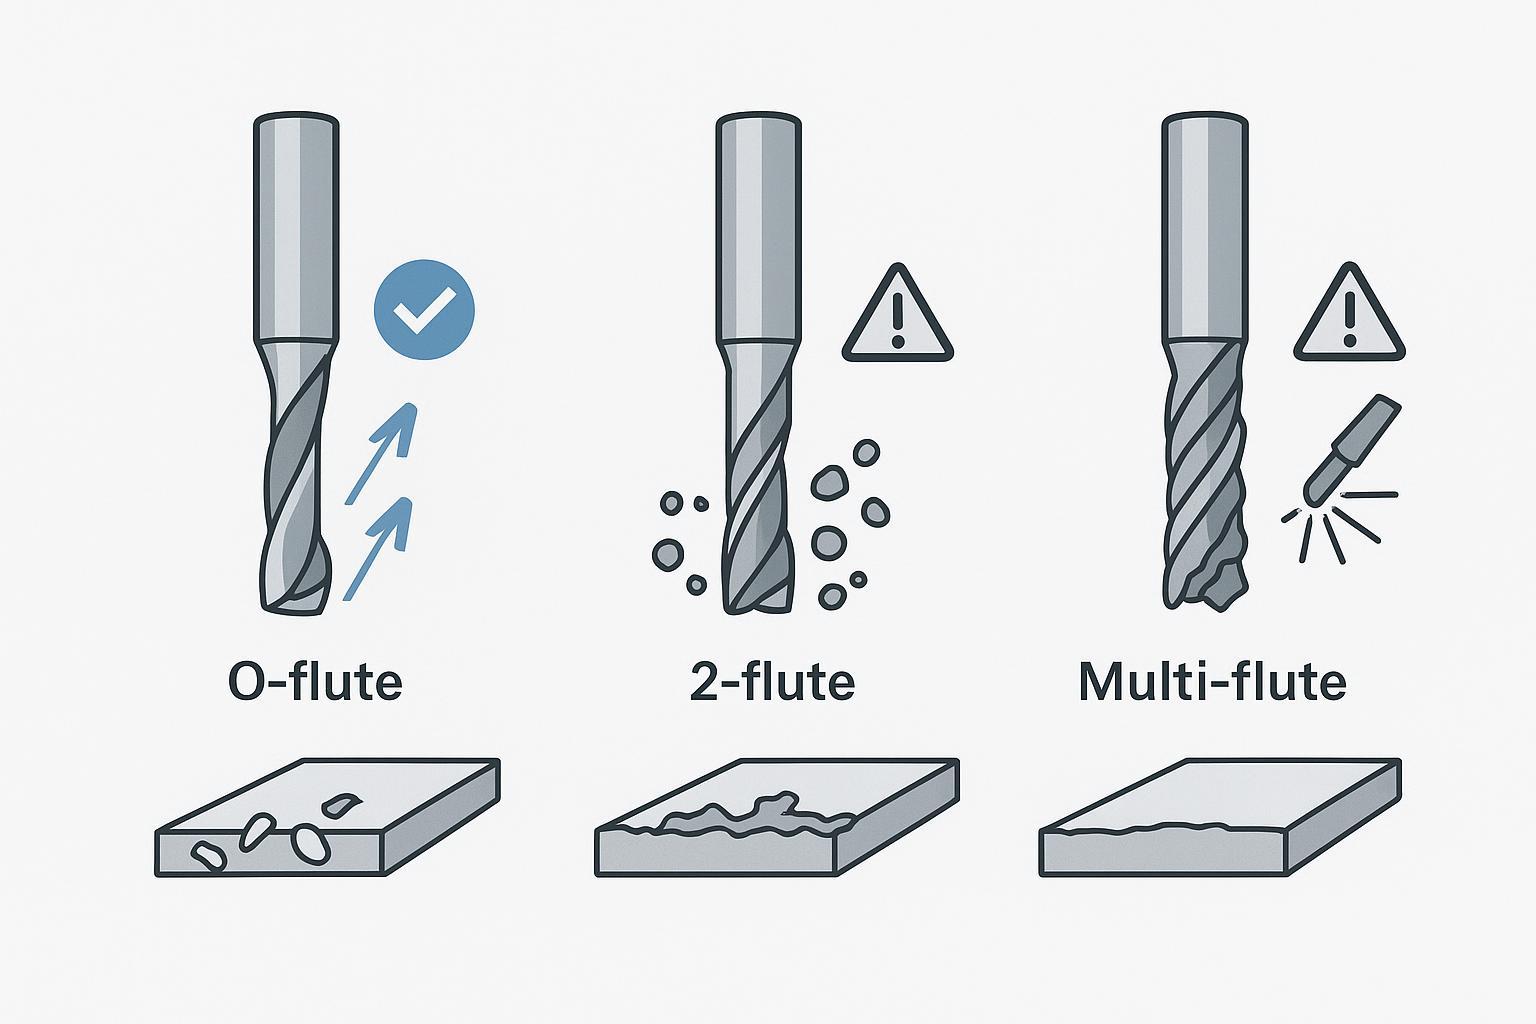
Most acrylic failures start with the tool.
Recommended starting bit
For most acrylic CNC cutting, the safest starting point is:
- Sharp, polished, single-flute O-flute upcut bit
Why it works:
- More space for chips (less chip packing)
- Lower friction than multi-flute tools
- Chips eject cleanly, so they carry heat away instead of melting back into the cut
Tool quick-pick table
Tool type | Recommended? | When it makes sense |
|---|---|---|
Single-flute O-flute upcut | Yes (default) | Profiles, pockets, most acrylic work |
2-flute end mill | Sometimes | Rigid machine + dialed-in chip evacuation |
Multi-flute (3+ flutes) | Usually no | Higher heat risk, chip packing |
Downcut | Use carefully | Top-surface protection on thin sheets; watch chip packing |
V-bit / engraving bit | Yes (for engraving/chamfer) | Shallow engraving, edge chamfers, lettering |
Wood compression bit | No (for acrylic) | Designed for wood chip flow; tends to trap plastic chips |
Pro Tip: If acrylic chips are sticking to the tool, a polished flute and good air blast are often more important than “going slower.”
Acrylic routing is a heat-control problem (chip load beats “slow and safe”)
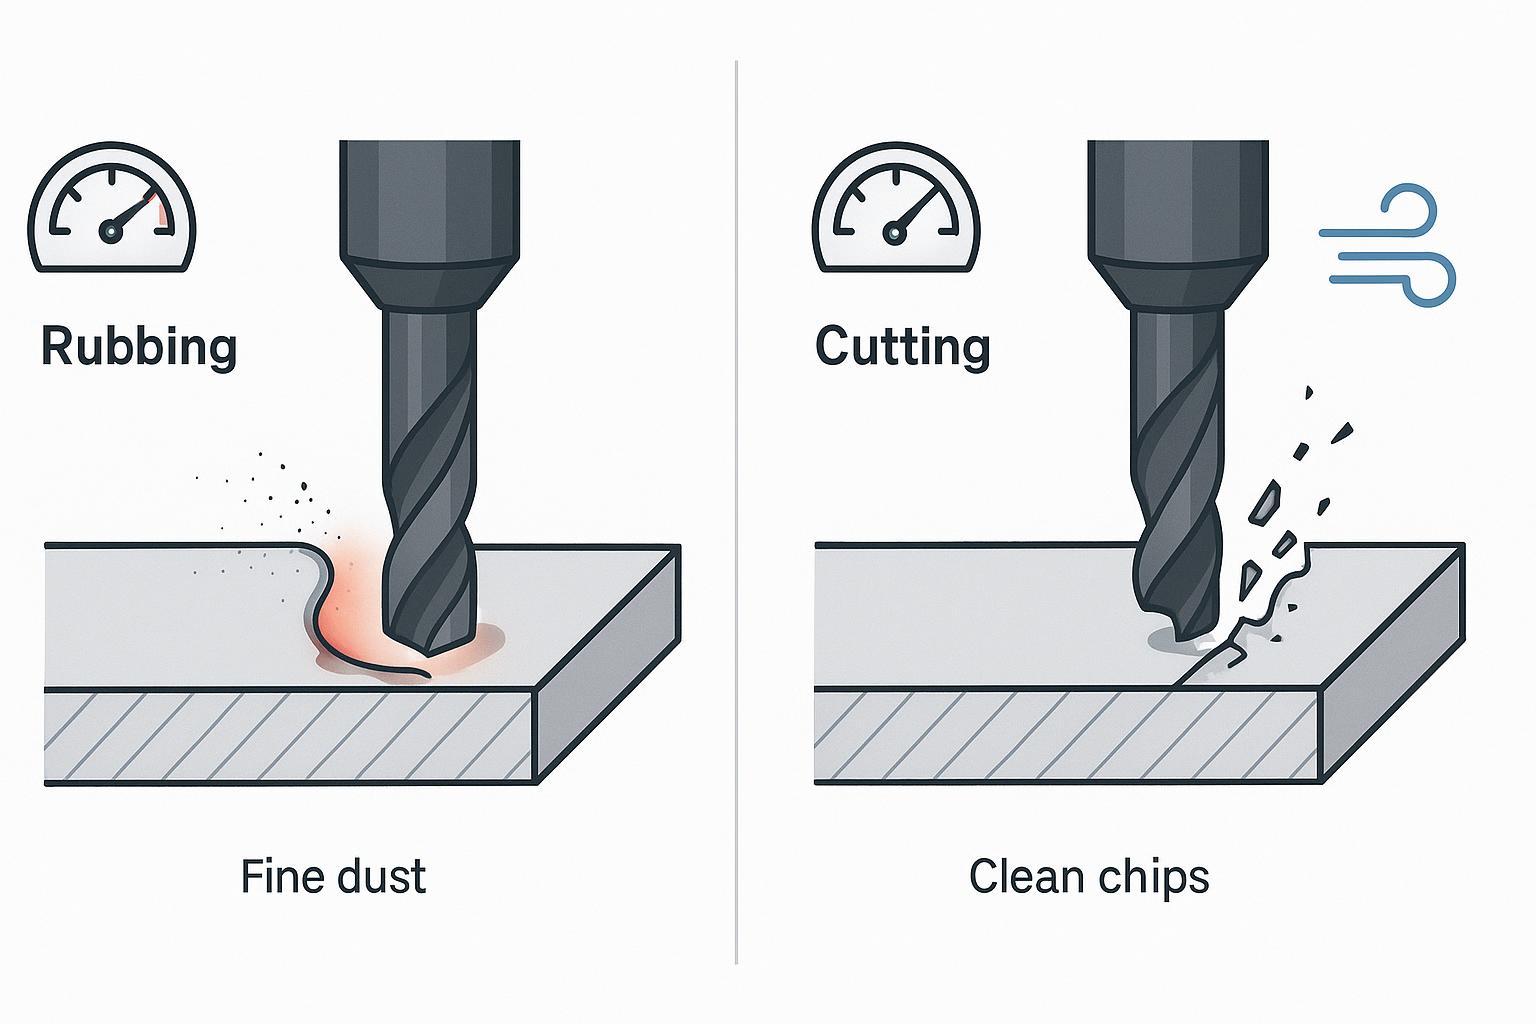
Acrylic melts when the cutter rubs instead of cuts.
That’s why “high RPM + slow feed” often makes things worse: it creates friction, heat, and re-cutting of hot chips.
A better mental model is:
- Your goal is to make chips, not dust.
- Chips carry heat away from the cutting edge.
ACRYLITE® (an acrylic sheet manufacturer) gives a practical routing target: chip load of 0.004″–0.015″ per tooth and typical feeds around 100–300 IPM, with RPM commonly in the 10,000–20,000 range — then adjust based on finish and stability. See ACRYLITE’s routing guidance for acrylic sheet.
What to look for while cutting
What you see | What it usually means | What to change |
|---|---|---|
Real chips (not powder) | Chip load is closer to correct | Keep going; fine-tune for finish |
Fine powder/dust | Chip load too low → rubbing/heat | Increase feed or reduce RPM |
Melted edge / gummy chips | Too much heat or poor chip evacuation | Increase feed, improve air blast, consider lower RPM |
Chipping/cracking | Too much tool pressure or part movement | Improve workholding, ramp entry, reduce depth per pass |
Step-by-step: how to cut acrylic with a CNC router (cleanly)
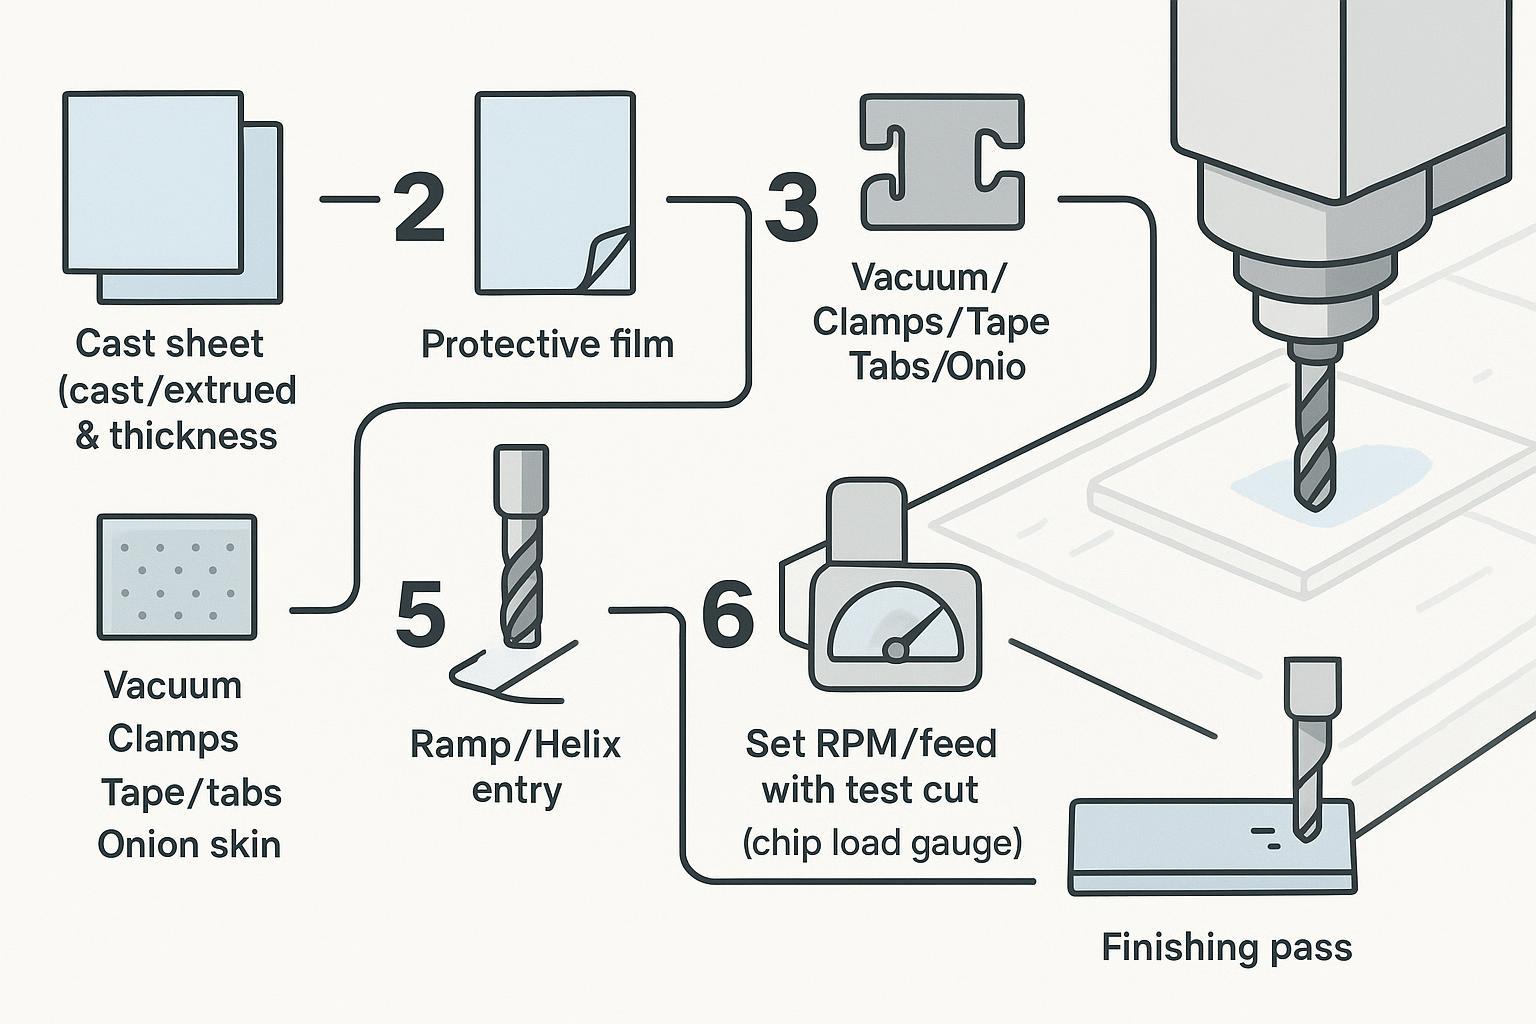
This workflow assumes you’re cutting acrylic for signs, panels, display parts, letters, or small fixtures.
Step 1: Choose the sheet and thickness on purpose
Input: acrylic sheet + job requirements (clear edge vs painted, thickness, finish)
Action:
- Prefer cast acrylic when edge quality and engraving quality matter.
- If using extruded, plan extra time for test cuts and chip evacuation.
Done when: you can clearly answer “cast or extruded?” before you set parameters.
Step 2: Decide whether to keep the protective film on
Input: sheet with paper/plastic film (or bare sheet)
Action:
- In many jobs, keeping the film on helps reduce scratches during handling and machining.
- If the film reduces vacuum hold-down, blocks visibility, or changes edge behavior, test both ways.
Done when: you can hold the sheet flat and it stays stable through the final pass.
Step 3: Lock in workholding before you touch feeds and speeds
Acrylic is unforgiving when it moves. The failures look like “bad settings,” but the root cause is often holding.
Input: spoilboard/sacrificial board, vacuum table or clamps, tape, tab strategy
Action (pick what fits your job):
Workholding method | Best for | Watch-outs |
|---|---|---|
Vacuum table | Full sheets, flat panels | Small parts can shift after through-cuts |
Clamps + sacrificial board | One-offs, thick parts | Keep clamps out of toolpath |
Double-sided tape | Thin sheets, small parts | Cleanup time; test adhesion |
Tabs | Letters/nested parts | Requires manual cleanup |
Onion skinning | Small parts, delicate geometry | Needs a final skim pass |
⚠️ Warning: Vacuum hold-down is useful, but it’s not always enough. Small acrylic letters, nested parts, thin sheets, and final through-cuts often need tabs, onion skinning, tape, or stronger zoning.
Done when: you can push on the sheet/part by hand and it doesn’t shift or chatter.
Step 4: Pick the bit and minimize runout
Input: bit + collet
Action:
- Start with a sharp single-flute O-flute upcut.
- Keep tool stickout as short as practical.
- Use a clean collet and avoid worn collets (runout increases chipping and haze).
Done when: the tool runs smoothly, without visible wobble, and chips evacuate cleanly.
Step 5: Use ramp entry (don’t plunge like it’s plywood)
Input: CAM toolpath settings
Action:
- Use a ramp/helix entry or lead-in whenever possible.
- Avoid straight plunging into acrylic on critical edges.
Done when: entry points look clean (no chipped “white” entry crater).
Step 6: Set a safe starting point for RPM and feed — then test-cut
If you’re looking for acrylic CNC cutting speeds and feeds, treat any numbers as starting points, not universal settings. Your chips and edge will tell you what to change.
There’s no universal recipe, because results depend on:
- bit diameter and flute count
- sheet type (cast vs extruded)
- thickness
- spindle power and runout
- chip evacuation and air blast
- machine rigidity
That said, many shops start in ranges like:
- ~12,000–18,000 RPM
- ~100–200 IPM
…and then tune based on chips and edge behavior.
ACRYLITE’s routing guidance provides a useful framework: use chip load targets and compute feed from RPM, flute count, and desired chip load.
Done when: you’re getting chips (not dust) and the edge isn’t softening or welding.
Step 7: Add air blast (dust collection alone often isn’t enough)
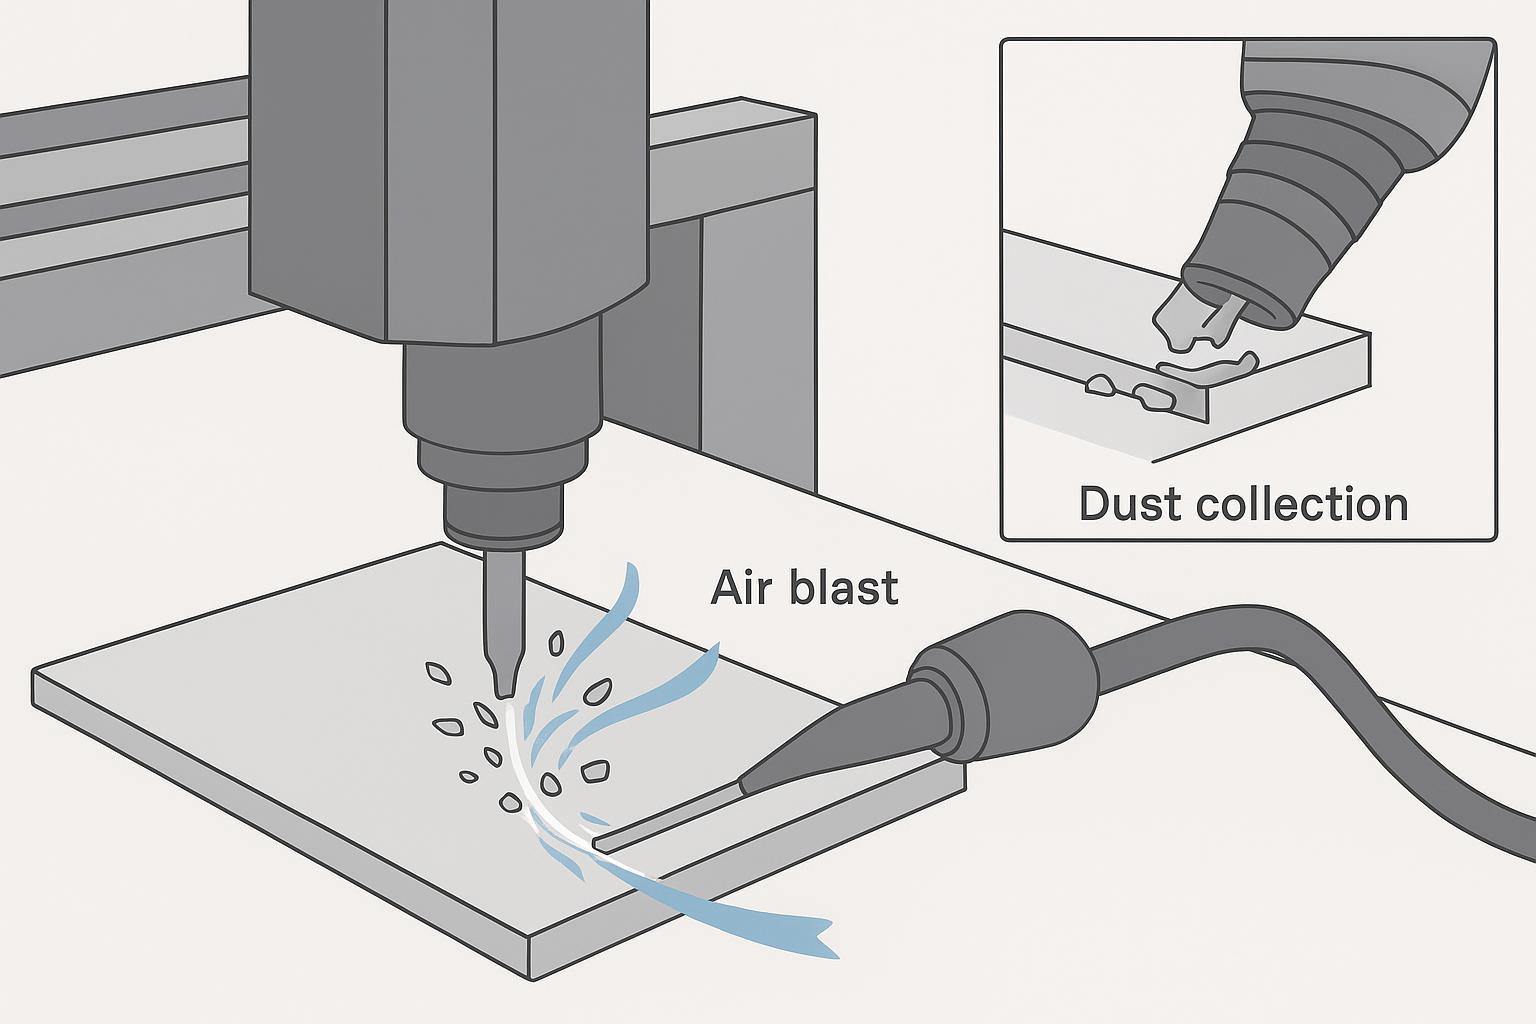
Input: compressed air nozzle or air knife, aimed at the cut
Action:
- Blow chips out of the kerf so they aren’t re-cut.
- Treat air as both chip evacuation and cooling.
If melting persists, ACRYLITE notes adding compressed air or cooling can help when parameters alone don’t solve it.
Done when: the groove stays clear and chips don’t pile up in corners.
Step 8: Use cut strategy that protects edge quality
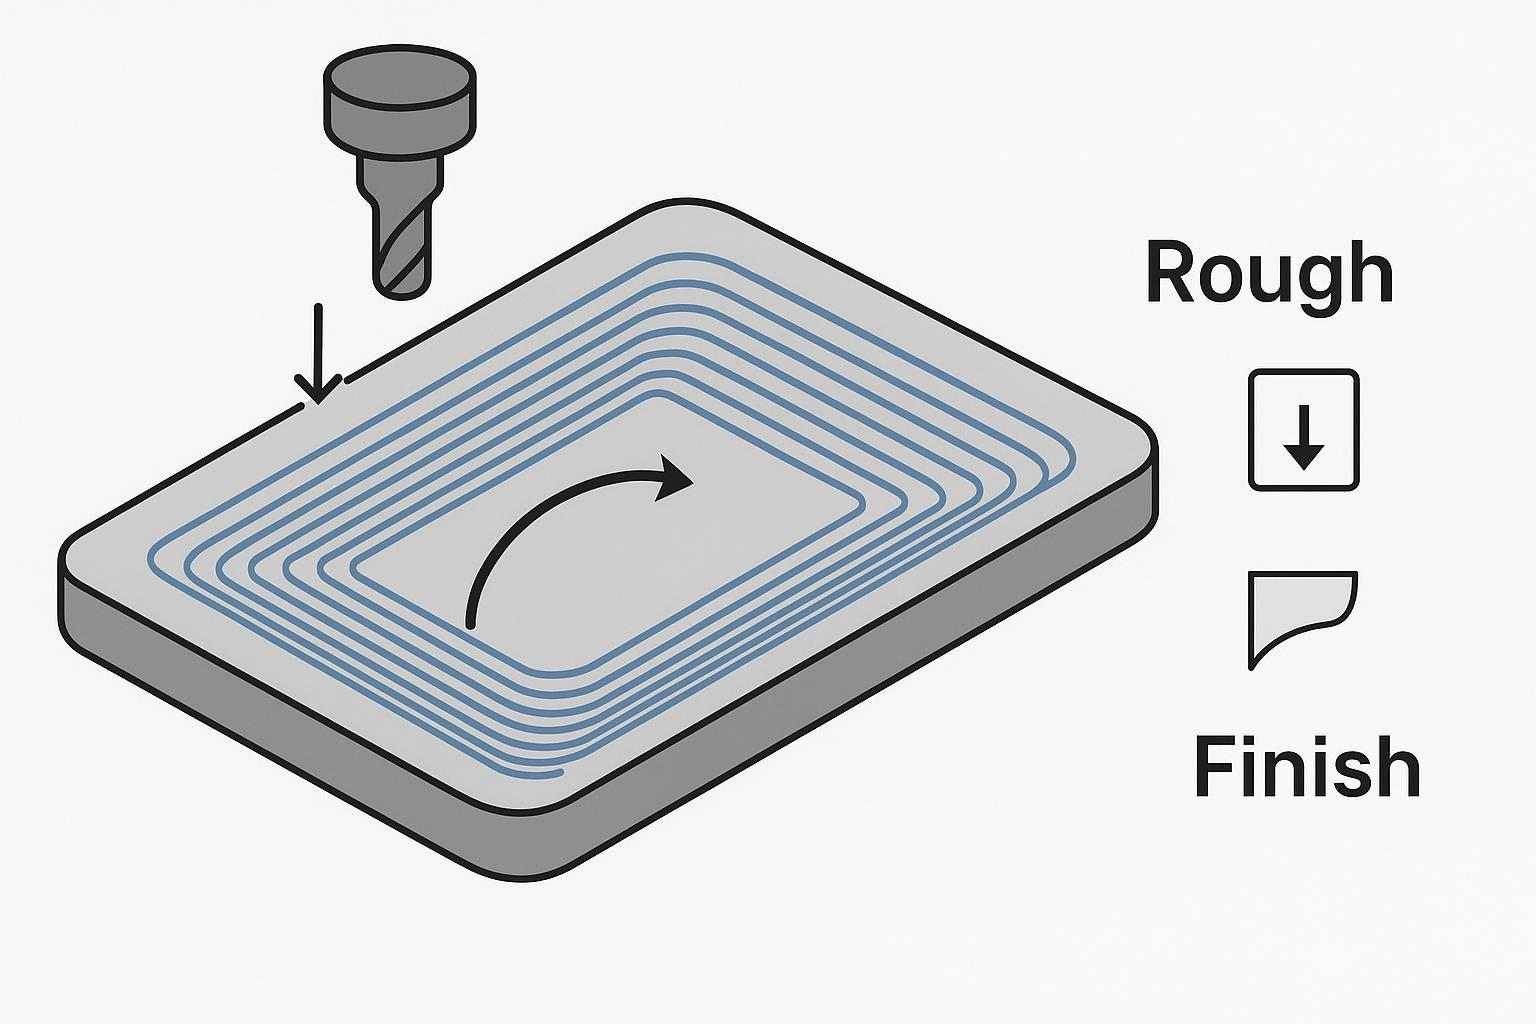
Input: depth per pass, finishing allowance
Action:
- Avoid overly deep passes that create heat and tool deflection.
- If edge clarity matters, leave a small allowance and run a light finishing pass.
Done when: the last pass produces a consistent edge without chatter marks.
Getting a “clear edge”: what to expect and what’s realistic
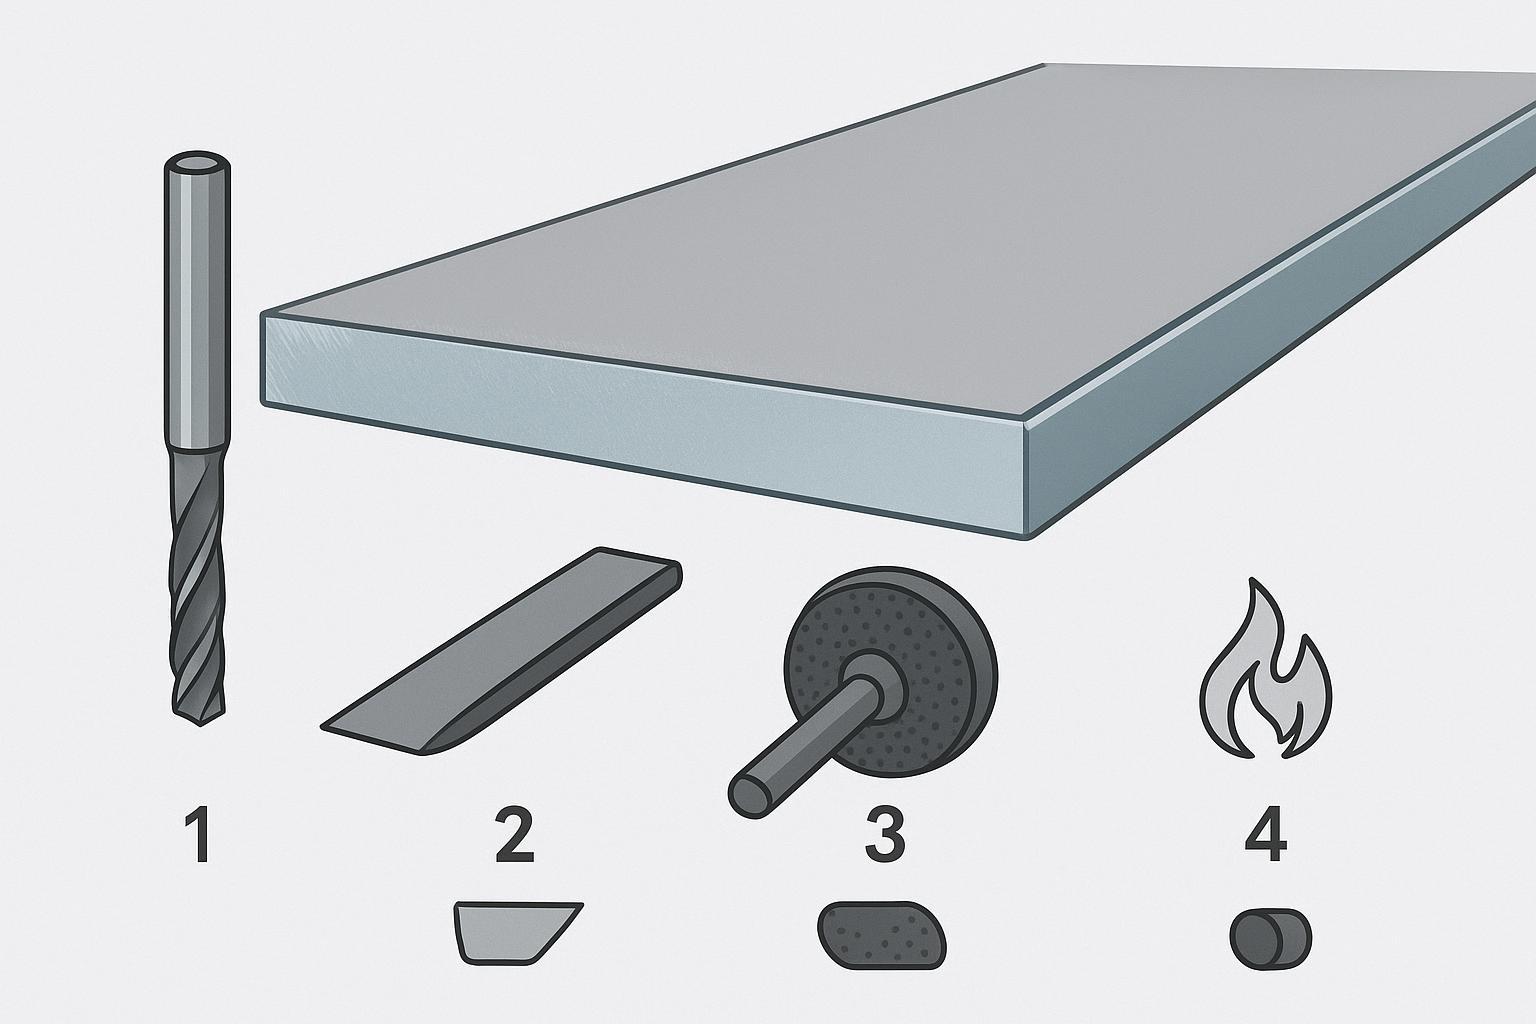
A CNC router can produce clean, accurate acrylic edges — but if you need an optical-clear, display-grade polished edge, you may still need post-processing:
- scraping
- sanding/buffing
- flame polishing or vapor polishing (where appropriate)
Good tooling and chip evacuation can reduce finishing time dramatically, but it won’t remove finishing in every case.
Troubleshooting: problem → likely cause → fix

This table is designed to be used on the shop floor.
Problem | Likely cause | Fix |
|---|---|---|
Melted edge | RPM too high, feed too slow, poor chip evacuation, dull tool | Increase feed, improve air blast, consider lower RPM, change to sharp O-flute |
White/cloudy edge | Heat, rubbing, recutting chips, dull tool | Increase chip load, improve chip clearing, use polished flute bit |
Chips welded back into cut | Chip packing, no air blast, too many flutes | Switch to single-flute O-flute, add air blast, reduce depth per pass |
Chipping on entry | Plunge entry, vibration, poor support | Ramp/lead-in, improve support, reduce aggressiveness |
Cracking | Part movement, too aggressive cut, stress in sheet | Improve workholding, reduce pass depth, use cast acrylic, ramp in |
Bit clogging | Wrong bit geometry, rough flute finish, poor evacuation | Polished O-flute, stronger air blast, check chip load |
Chatter marks | Weak hold-down, tool stickout, machine vibration | Better fixturing, shorten tool, adjust RPM/feed, check bearings/collet |
Small parts move on final pass | Vacuum alone loses grip after through-cut | Tabs, onion skinning, tape, change nesting/order |
Scratched surface | Chips trapped on top surface, handling | Keep film on, clear chips with air, clean before finishing |
Many of these fixes mirror manufacturer troubleshooting guidance such as ACRYLITE’s routing guidance for acrylic sheet.
Myth vs fact (common acrylic CNC mistakes)
Myth 1: Any wood router bit can cut acrylic
Fact: Acrylic needs plastic-suitable geometry and sharp edges. Wood compression bits and dull multi-flute tools can trap chips, increase friction heat, and melt acrylic. A single-flute O-flute is usually the safer start.
Myth 2: Higher RPM always gives a cleaner acrylic edge
Fact: If feed is too slow, high RPM increases rubbing and heat. Edge haze and melting often come from heat, not “low speed.”
Myth 3: Cutting acrylic slowly is always safer
Fact: Too slow can be worse because the tool rubs instead of cuts. You want real chips that carry heat away.
Myth 4: Cheap extruded acrylic is always fine
Fact: Extruded can be machined, but it’s less forgiving. Cast acrylic is usually the safer choice for routing and engraving.
Myth 5: Vacuum hold-down alone is always enough
Fact: Small parts, letters, and through-cuts often need tabs, onion skinning, tape, or clamps.
Myth 6: Plunging straight down is fine
Fact: Plunge entry can chip/crack acrylic and overheat the entry point. Ramp or helix entry is safer.
Myth 7: CNC routing always produces a polished edge
Fact: CNC can be clean and accurate, but optical-clear edges may still require finishing.
Myth 8: Laser cutting is always better for acrylic
Fact: Laser edges can look glossy and “polished,” but CNC is often better for thick acrylic and 3D features like pockets, holes, chamfers, and countersinks.
CNC router vs laser cutter for acrylic (what each is actually good at)
Criteria | CNC router cutting acrylic | CO2 laser cutting acrylic |
|---|---|---|
How it cuts | Mechanical chip removal | Thermal melt/vaporize |
Edge look | Clean possible; may show tool marks or slight frost | Often glossy/polished-looking |
Thick acrylic | Generally better | Often limited by power/heat effects |
Pockets/grooves | Strong | Limited vs true machining |
Holes/countersinks/chamfers | Strong | Not a true substitute |
Risks | Melting, chatter, part movement | Heat effects, taper, smoke/odor |
Best fit | Dimensional parts, machining features, thicker sheets | Flat decorative profiles, high edge aesthetics |
A useful neutral framing is: laser often wins for “polished edge signage,” while routing wins for “machined acrylic parts.” See a practical overview in CNC vs laser cutter tradeoffs for acrylic.
What CNC machine is best for acrylic cutting? (selection checklist for how to cut acrylic with a CNC router)
If acrylic is going to be a steady revenue stream (signs, display parts, letters), machine selection becomes less about “can it spin a bit” and more about repeatable heat control and stability.
Machine features that matter most
Feature | Why it matters for acrylic |
|---|---|
Rigidity (frame/gantry) | Less vibration → fewer chatter marks and edge haze |
Stable spindle + speed control | Lets you tune chip load without overheating |
Workholding options (vacuum zoning, table flatness) | Prevents part movement on through-cuts |
Chip management | Acrylic needs chip evacuation; you’ll likely add air blast |
Motion smoothness/backlash control | Better edge finish, especially on curves and letters |
ATC (optional) | Helpful when switching between engraving, profiling, chamfer tools |
Quick CNC internal options to explore (by shop type)
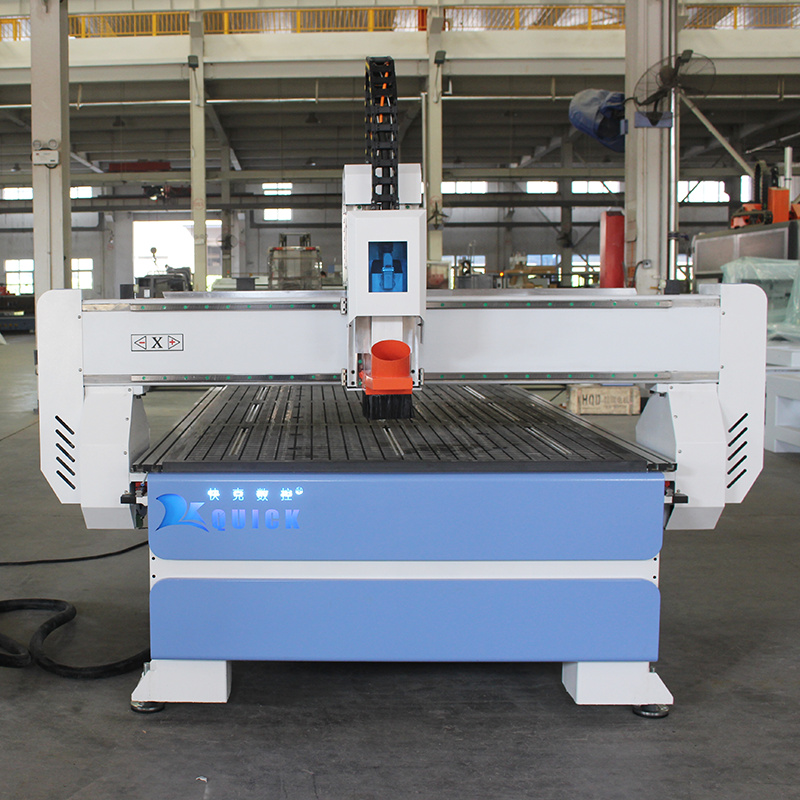
- If you want to browse router types and sizes: Quick CNC router category
- If you’re a small sign shop or need compact routing for acrylic parts and prototypes: CNC Router 6090
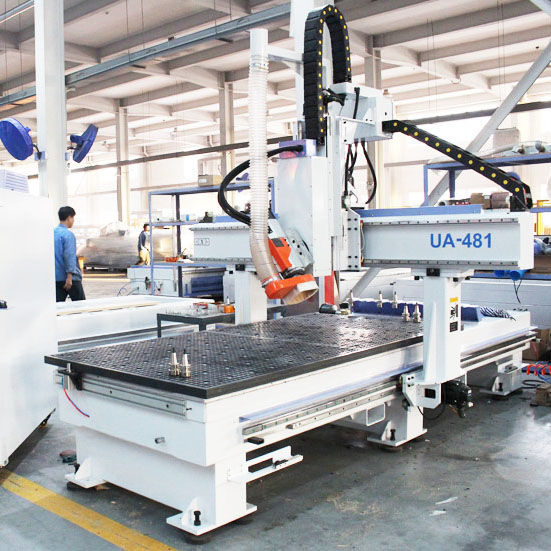
- If you do multi-tool workflows (engraving + profile + chamfer) and want fewer manual tool changes: 12 Tool Linear ATC CNC Router UE-481
If you already know the machine style you want to compare (3-axis, 4-axis, PTP, 5-axis), use the product listing hub: Products.
FAQ
Can a CNC router cut acrylic without melting it?
Yes — if you control heat through chip load, chip evacuation (air blast), and a sharp plastic-suitable bit. Melting most often comes from rubbing (too slow) or recutting trapped chips.
What bit should I use for acrylic CNC cutting?
A sharp, polished single-flute O-flute upcut is the best all-around starting choice for acrylic routing.
Should I use cast or extruded acrylic?
For routing and engraving, cast acrylic is usually more forgiving. Extruded acrylic can work, but it’s easier to melt and demands tighter process control.
Is CNC or laser better for acrylic signs?
If you need a glossy, “polished” edge on flat profiles, CO2 laser is often the best choice. If you need thickness, pockets, holes, chamfers, or dimensional machining, a CNC router is usually the better fit.
Why do my acrylic parts move at the end of the cut?
Because once the part is fully cut through, vacuum grip can drop sharply. Use tabs, onion skinning, tape, clamps, or better zoning to keep small parts stable.
Next step
If acrylic is becoming a consistent part of your workload, it’s worth choosing a router setup that gives you stable hold-down and smooth motion — that’s where edge quality becomes repeatable. You can compare options in the Quick CNC router category.